So you’ve decided to convert your personal Pinterest account into a Pinterest business account? Great. Pinterest for business is a little bit different from pinning for personal use and your business account needs to be set up in a keyword-optimized way. Converting a personal account into a business account is not difficult but you’ll need to take a few actions to ensure it’s properly set up.
Public announcement! Although the content of this post is still mostly relevant as of December 2024, it is due for a rewrite and update. Stay tuned.
Should I convert my personal Pinterest account or start fresh?
I’ve explained the differences between personal and business accounts in greater length over here, but the gist is that I recommend creating a new Pinterest business account from scratch unless you’ve already been creating original content on the personal account.
Convert Personal Pinterest Account Into Pinterest Business Account Step by Step
To convert a personal account into a business account, click on the three dots in the top right corner and then on “Edit settings”.
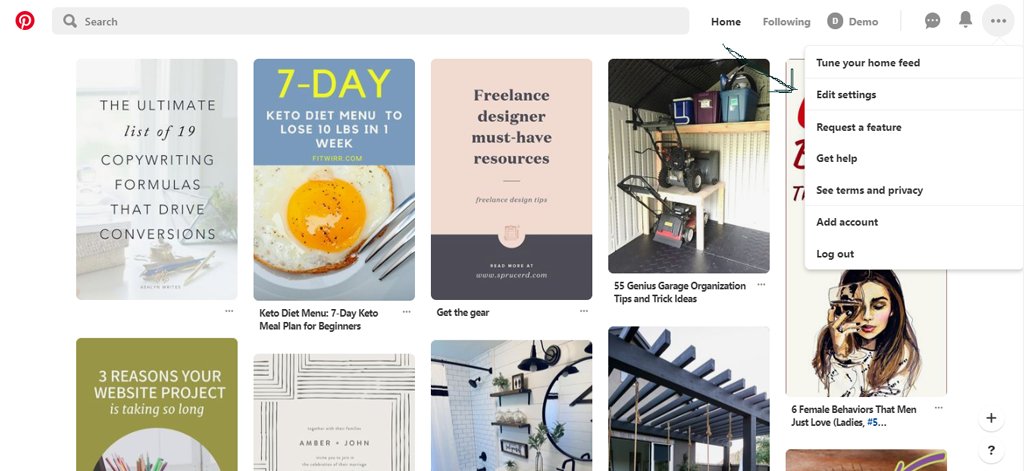
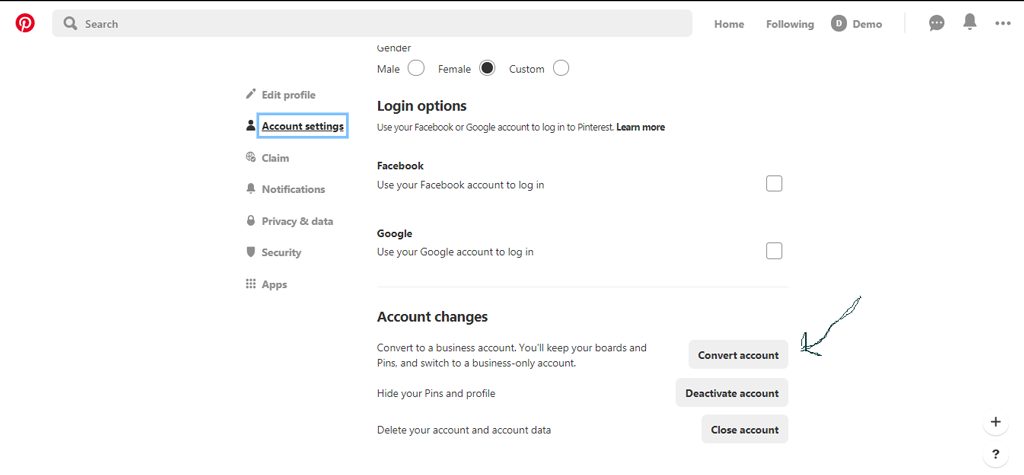
In the next window navigate to Account Settings, scroll to the bottom, and click Convert account.
Congrats, you now have a business account!
Verify Your Website
No matter whether you start a Pinterest business account by converting or starting from scratch, the first thing to do is claim your website on Pinterest.
If you do this, you’re signaling Pinterest that you are a legitimate business and any pins coming from your domain will be automatically associated with your profile (which is great and what we want!).
Another great benefit you’ll get by verifying your website is access to website analytics – crucial for making informed decisions!
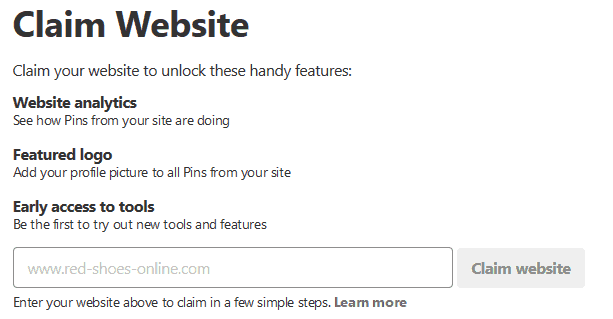
As of 2022, you can claim multiple websites per one Pinterest account and it has to be either your main website domain (www.yourbrand.com), a subdomain (subdomain.yourdomain.com), or a subpage like www.yourbrand.com/blog.
You can claim your website either by adding a meta tag to your website header or uploading an HTML file to your website’s root folder (on WordPress it’s usually called public_html and can be accessed via cPanel).
Find the full tutorial here: How to Quickly Claim Your Website on Pinterest (& Why You Should)
Set up rich pins
Activating Rich Pins is always a good idea when using Pinterest for business.
What are Rich Pins? According to Pinterest, Rich Pins show metadata right on the Pin itself, giving Pinners a richer experience and increasing engagement. Rich Pins have a bold title and stand out in the feed.
Find the full tutorial here: The Complete Guide to Pinterest Rich Pins: What Are They, Why You Need Them & How to Set Them Up
Edit Your Profile
Now that your account is a business account, it’s time to brand your Pinterest profile!
Add a new profile picture. My audience is online service-based business owners. You are the face of your brand and business, so show it! Make sure to use a crisp and beautiful photo of your friendly face, preferably the same photo you use on every other social platform.
Add keywords to your business name. Keywords are all the rage on Pinterest so make sure to use keywords to describe what it is that you do. Keep in mind that Pinterest has set a 65-character limit. However, you can bypass that by changing your business name on the mobile app. 2019 update: Pinterest no longer allows long profile names and encourages using your business name as your display name.
Write your bio. About text can be 500 characters long so make good use of it. My recommendation? Describe in one sentence what it is that you do while weaving in 2-3 keywords! I recommend not wasting precious character space for a call-to-action link since links in the bio are not clickable.
To add your location or not? When your business location is wherever you currently are (in other words, your business is an online business), it is not crucial to add your location. Only do so if you wish to attract clients from a specific area.
Create a Board for Your Original Content
Next, create a dedicated board for your original content and name it after your business. Add primary keywords to the board name and/or description. If you have enough content, make sure to pin at least 10-15 posts so that your board doesn’t look sparse, and then make it a habit to save new content there every time you publish.
Overhaul Your Boards
It’s time to tackle the boards you have from your personal account days. Here’s how I do it when someone hires me for a Pinterest makeover.
Before you start working on boards, make sure you have a clear idea of what message you want your Pinterest profile to communicate.
Set one or two overarching topics. This should be your main area of expertise, i.e. Pinterest marketing and business tips. I do Pinterest marketing and my target audience is women-owned online service-based businesses, therefore I create content catered to them.
Then break down your big topic into pieces and create niche categories. Think about what content you’re creating, what problems your clients and target audience have, and what they’re searching for on Pinterest. These will be your Pinterest boards.
Now that you have a plan in place, let’s evaluate each board and divide them into three categories:
- non-niche boards that are not relevant to your business
- niche boards that can be kept
- boards that should be merged
Irrelevant boards
Sometimes my clients are worried they can no longer use their account for personal pinning after I’m done with their account makeover.
This is simply not true.
Sure, you don’t want to keep pinning lunch ideas publicly when you have a graphic design business. That’s why Pinterest has secret boards. You set boards that don’t align with your new business profile secret and keep using them but your followers will not see those pins on their Smart Feed.
As of February 2018, Pinterest also lets you archive Pinterest boards you’re no longer using but don’t want to delete. Pinterest does not take archived boards into account, it’s like they don’t even exist. Archived boards can always be unarchived.
Before you secret or archive a board, make sure to go to Analytics (Analytics – Profile – Clicks – Boards with the most clicked Pins) and check whether the board is listed or not. If it is viral and bringing in traffic, I’d just leave it alone. If it isn’t, feel free to secret or archive it.
Niche boards
These are boards that fit your business niche and topics that are relevant to your business and target audience. Again, add a proper keyworded title and write a keyword-rich description. It’s a good idea to categorize your boards – just pick the category closest to what you do.
Merged boards
Some boards might have similar content and it makes more sense to move pins to one board. Follow the same protocol and add a proper title, description, and category.
What about group boards?
If you have any group boards, evaluate them too. Are they relevant to your business and audience? Even more so, are they even effective? If a group board is not active, there’s no point. Remove yourself from group boards that no longer serve your interests as a Pinterest business user.
Set board order
Once your boards have been evaluated, it’s time to reorder them. Boards can be sorted by alphabet, date last pinned to, or custom order.
The general rule is to have your most important boards at the top. Your brand board should always be first and your most important board right after it. Always prioritize your own boards before group boards – group boards should be at the bottom.
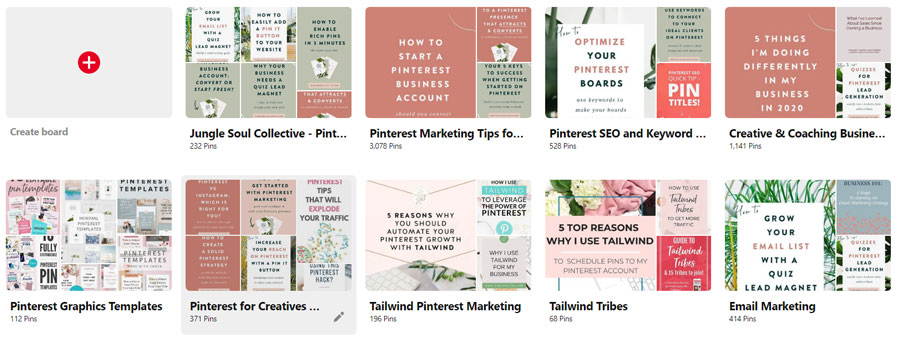
Optional: Board covers
Board covers can make your profile look more cohesive but they’re not absolutely necessary. Designing and setup can take a while and I’m sure there are a lot more important things on your to-do list. That’s also why I don’t include board covers in my management packages by default – they’re not crucial.
However, I will say that since Pinterest is very visual, using board covers makes your brand more cohesive, adds a special touch, and helps you stand out.
Before you, pin it for later!











This post was super helpful! I had no idea how easy it was to convert my personal Pinterest account into a business one. The tips on optimizing my profile were particularly useful. I can’t wait to start using Pinterest to grow my service-based business! Thank you, Jungle Soul Collective!