


Are you setting up your Pinterest business account? Don’t forget to include Rich Pins in your Pinterest marketing strategy!
Rich pins are an enhanced version of good old regular pins and definitely belong in the toolkit of every service-based business on Pinterest. I get asked about Rich Pins a lot because Pinterest’s instructions for setting them up seem daunting to less techy users.
If you haven’t enabled Rich Pins yet, it’s not too late to get started. It’s a 3-minute fix and although it might seem a little complicated at first, I assure you it’s not.

The Complete Guide to Pinterest Rich Pins
What are Rich Pins on Pinterest
Rich Pins are enhanced Pins with extra oomph. They include extra information right on the pin and make the Pin more actionable. Here’s how Pinterest describes Rich Pins:
Rich Pins show metadata right on the Pin itself, giving Pinners a richer experience and increasing engagement. Information in a Rich Pin is independent of the Pin description, ensuring that important information is always tied to the Pin.
Rich Pins vs Regular Pins
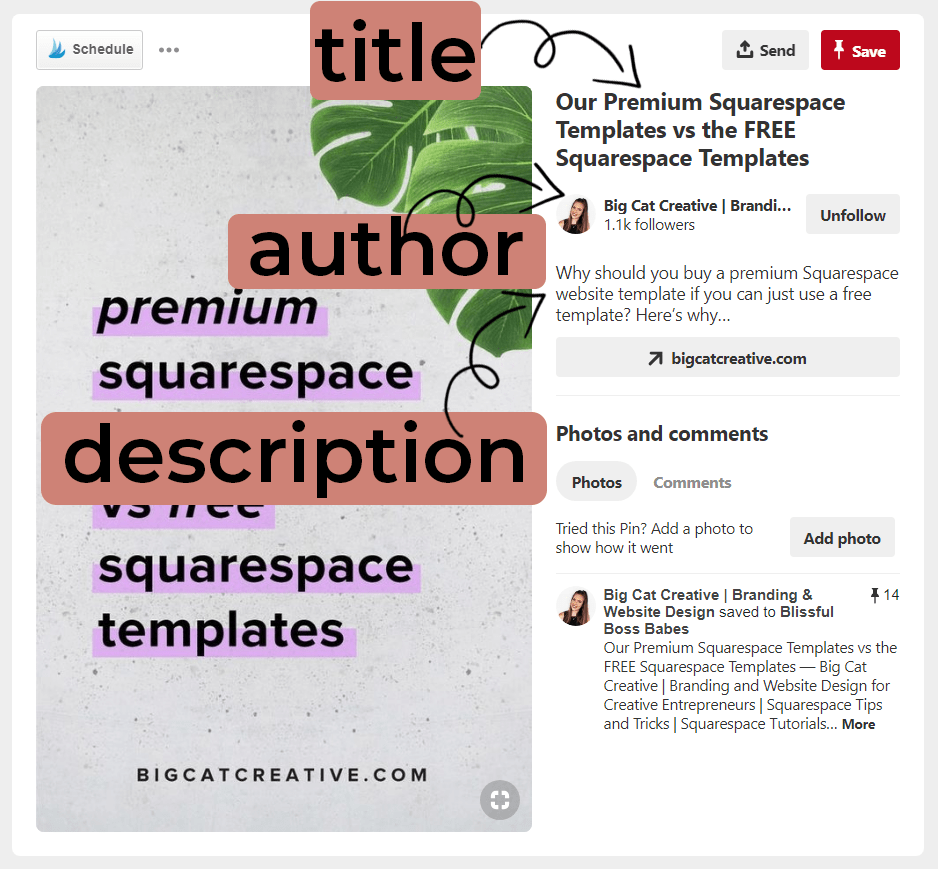
Rich Pins are a bit different from regular Pins. Spotting a Rich Pin in your feed is easy because the title is in bold font and the name of the business and logo are displayed within the Pin.
Here’s what a Rich Pin looks like:
Rich Pins was introduced by Pinterest in 2013. Back then Pinterest partnered up with several major publishers, brands, and retailers to display more information about movies, products, places, and recipes. Since then Pinterest has become even more business-friendly and helps content creators, business owners, and online sellers increase traffic, visibility, and conversions.
Compared to regular Pins, Rich Pins are more informational and thus helpful. Plus, once the information is added to the Pin, it stays with it no matter how many times it’s pinned and by whom.
Rich Pin grabs the metadata from your site and displays on it Pinterest. The awesome thing is that if you make changes, Pinterest automatically updates your Rich Pins too. This is especially useful for those of us who sell something.
Also, can we talk about professionalism for a second? With Rich Pins installed every Pin associated with your domain (no matter if you pinned it or not) is branded, credited to you, and shown as a Rich Pin.
Do you need Rich Pins? The answer is simple: yes. If you have a business and produce content, you need Rich Pins. Pinterest is a search engine and you want your content to show up in search. Rich Pins make your content stand out. Extra information on the Pin makes the Pin more useful and relevant for viewers searching for similar content. Pinterest also favors Rich Pins and shows them more than good old regular pins.
Are Rich Pins still a thing in 2024?
Yes!
Types of Rich Pins for Service-Based Businesses
Article Pins
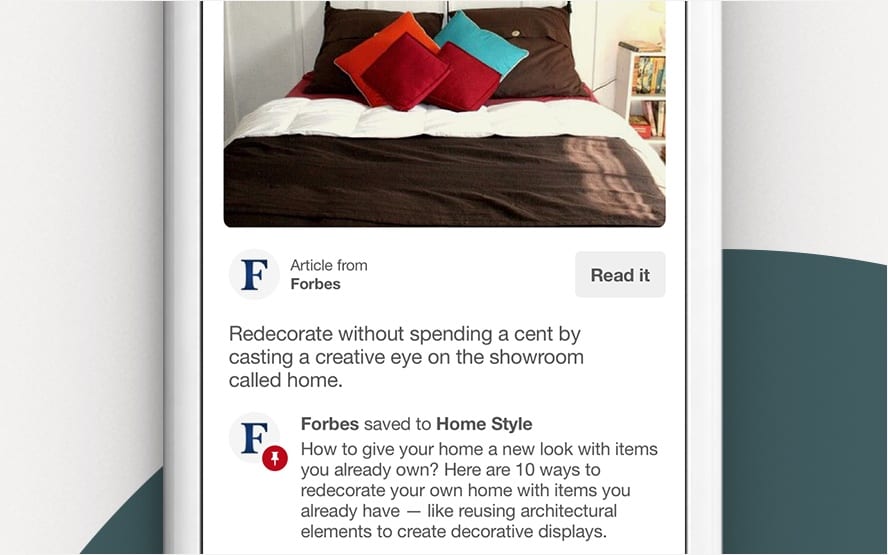
Article Pins include a headline, author, and story description, giving you an idea of the story the article tells. Article Pins are perfect for bloggers and anyone with text content.
Product Pins
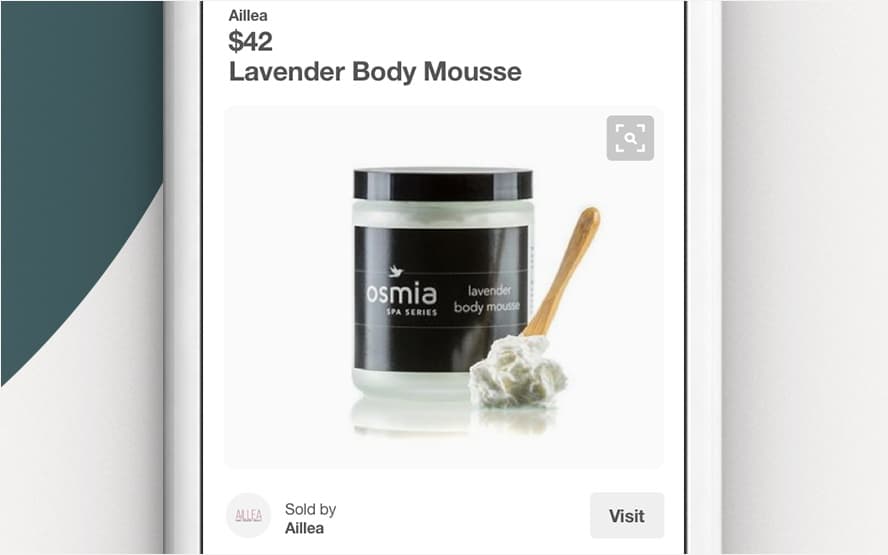
Product Pins show extra information about the product including price, availability, and purchase location. Product Pins are perfect for online sellers.
How to get Rich Pins on Pinterest
As a Pinterest strategist for online service businesses, I’m writing this post specifically about Article Pins and Product Pins.
To get started, your Pinterest account has to be a business account. If yours isn’t, don’t fret! I have a blog post on how to convert your existing Pinterest account into a business account.
To enable Rich Pins, you’ll simply need to add metadata to your website.
It is no longer necessary to validate Rich Pins.
Before you start adding metadata for your pins, you should figure out your most applicable Rich Pin type.
You can have different types of Rich Pins on your site but not on the same blog post URL or page.
This means that for service-based businesses (including creatives, coaches, and consultants), it makes the most sense to start by installing Article Pins.
That means that if you’re an online shop, it makes sense to start by installing Product Pins. If you’re a service-based business that produces content and promotes it on Pinterest (such as myself), you might want to start by installing Article Pins.
When you have both Product Pins and Article Pins installed, your articles and blog posts will automatically show up as Article Pins and product pages will show up as Product Pins. When you have a product inside of a blog post or page, and you’ve added the necessary markup for the product, the post or page will show up as a Product Pin instead of an Article Pin.
Step 1. Add metadata to your site
This instruction works on WordPress and is meant for activating Article Pins.
There are two ways to add metadata to your site – manually or by using Yoast SEO. Yoast SEO is not just useful for activating Rich Pins. It’s also one of the best SEO plugins out there. Using Yoast for Rich Pins is much simpler and quicker, especially if you’re not very well-versed in tech.
Sidenote: if you’d rather add metadata manually, scroll down a little further.
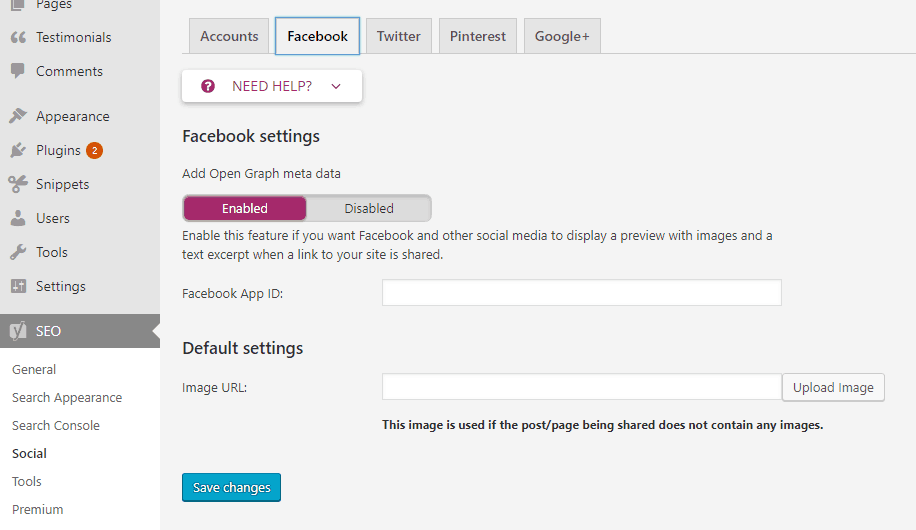
Step 1.1. Install and activate the Yoast SEO plugin. Configure the settings to your needs.

Step 1.2. Navigate to SEO –> Social –> Facebook and click Enabled under Add Open Graph metadata.
Enabling Product Pins
If you’re using Shopify, Etsy, or eBay to sell your products, the markup has already been added.
For instructions on how to manually add the correct markup for Product Pins, scroll down.
How to manually add Article Pins on WordPress
If you’d rather add metadata, you’ll need to add some code to your site header.
You may be one of the lucky ones and use a theme that allows you to add header and footer boxes to your posts and pages, such as Genesis Framework. If yours doesn’t, you’ll need to install a header/footer code plugin such as Head, Footer, and Post Injections by Stefano Lissa.
Navigate to the post and scroll down to the header script box. Paste the following code:
    <meta property="og:type" content="article" />
    <meta property="og:title" content="Title of Article" />
    <meta property="og:description" content="The article description or summary." />
The previous three metadata are required by Pinterest. You may also add these lines:
    <meta property="og:url" content="Link to article" />
    <meta property="og:site_name" content="The site name (e.g., "the Guardian")" />
    <meta property="article:published_time" content="The date the article was first published." />
    <meta property="article:author" content="The article author" />
Don’t forget to change the information before publishing changes. You’ll need to repeat this process for each page/post.
How to manually add Product Pins on WordPress
Many businesses and solopreneurs sell products directly on their sites. If this is the case, you can still enable Product Pins on your sales page, you just need to manually add metadata to your products.
You may be one of the lucky ones and use a theme that allows you to add header and footer boxes to your posts and pages, such as Genesis Framework. If yours doesn’t, you’ll need to install a header/footer code plugin such as Head, Footer, and Post Injections by Stefano Lissa.
Navigate to the post or page your product is on and scroll down to the header script box. Paste the following code:
<meta property="og:title" content="Product name" />
<meta property="og:type" content="product" />
<meta property="og:price:amount" content="15.00" />
<meta property="og:price:currency" content="USD" />
<meta property="og:description" content="Product description" />
Don’t forget to change the product information before publishing changes. You’ll need to repeat this process for each page/post your products are on.
If you’ve already applied for Article Pins, you don’t need to do anything else – your pin will now show up as a Product Pin.
What if you don’t want content from your site to contain rich info anymore?
No problem. Simply add the following code to the head section of your pages: <meta name=”pinterest-rich-pin” content=”false” />.
Before you go, save these instructions for later!


")


Hi,
Thank you for the informative blog post. I was wondering, is it possible to have rich pins for a blog and an Etsy shop?
Good morning. I have a squarespace website and In the beginning opted for article rich pins even though I’m a food blogger but now I’d like to switch to recipe rich pins.
I have read squarespace tutorials, Pinterest tutorials (even more confusing) as well as YouTube (very limited info. On this subject). How on earth do I switch from article to recipe rich pins?
Thank you in advance,
Wendi Anatomy of a Kitchen